serve
Jesus Washes The Disciples Feet
In this Bible story we see Christ humble Himself and give us a perfect example of how we should humble ourselves and serve others. At the same time the washing of the disciples feet reminds us of our need for our sins to be washed away by Christ.
What better way to make sure your kids remember this story then by having them make their very own soap.
Every time they wash up they will be reminded of Christ’s act of humility and the need to have their sins forgiven.

Snow Soap– (Quickest; Ideal For Young Children)
Materials
- 1 Ivory Bar, One Bar Will Be Enough For Two To Three Kids
- Small Plastic Containers
Instructions
- Cut a fresh Ivory bar into two to three pieces.
- Place the pieces of soap onto a microwavable plate.
- Heat the soap for 1 to 1.5 minutes. (The water molecules in the soap will begin to heat up and the soap will begin to inflate.)
- Allow the inflated soap to cool.
- Divide the inflated soap between the two to three kids.
- Have them crumble the inflated soap and place the pieces/powder into a small plastic container.
Your kids can place the container next to their sink at home.
Melt And Pour Soap– (Not Too Difficult; Requires One Day To Make)
Materials
- Melt And Pour Base, Can Be Purchased On Amazon Or Craft Stores
- Colorants (Colored Mica Powder Or Iron Oxides; Make Sure They Are Skin Safe) Or Look Up Natural Soap Colorants
- Additives (Oatmeal, Poppy Seeds, Dried Flower Petals, French Clay, Vitamin E Oil, Essential Oils, Fragrance Oils, Body Glitter)
- Small Plastic Containers Or Silicone Molds (Silicone Works Best)
- Rubbing Alcohol, In A Small Spray Bottle
- Plastic Spoons
- Plastic Bowls
Instructions
- Melt the melt and pour base in a microwavable container in 30 second burst until completely melted.
- Divide the melt and pour base between your kids into small plastic bowls, just enough to fill in their small plastic containers or silicone molds.
- Allow your kids to add a colorant and additives to their melt and pour base. Be careful with the additives and colorants, a little goes a long way. (If the soap starts to thicken before you are finished mixing in the colorants and additives, heat the soap base in the microwave for another 30 seconds.)
- Pour each child’s finished melt and pour base into their individual small plastic container or silicone mold.
- Spray a couple of squirts of rubbing alcohol on the top of the soap in order to pop all of the bubbles that have formed on the top of the soap.
- Allow the soap to harden completely. This can take anywhere from 20-40 minutes depending on the brand of melt and pour base that you have purchased.
Liquid Hand Soap– (Not Too Difficult; Requires Two Days To Make)
Materials
- 3 Cups Water, Distilled If Possible
- 2 Tablespoons Grated Fels-Naptha Soap or Any Other Hard Bar Soap, Soap With Added Moisturizes And Cream Like Dove Will Not Work
- 1/4 Teaspoon Washing Soda
- 1 Teaspoon Vegetable Glycerin
- Colorants (Colored Mica Powder Or Iron Oxides)
- 20 To 50 Drops Essential Oils (Clove, Lemon, Cinnamon, Eucalyptus, Rosemary, Lavender Or Tea Tree All Have Anti Fungal, Anti Bacterial Or Anti Viral Properties)
- Plastic Bowls
- Plastic Spoons
- Travel Size Shampoo Bottles
Instructions
- Combine the water, grated soap, and washing soda in a small sauce pan over medium heat. Heat until all of the ingredients have dissolved.
- Remove the saucepan from the heat and add in the glycerin and essential oils.
- Pour the liquid soap into a container or bowl, allow it to sit at room temperature for 6 to 12 hours or overnight. (Up to this point, you can do this at home and then let your kids finish the project in class. This way it will become a one day project.)
- After the liquid soap has had time to rest mix up the mixture using a whisk, a blender, an emulsion blender or have some fun and use your hands.
- Divide the liquid soap between your kids into small plastic bowls, just enough to fill in their travel size shampoo bottle.
- Allow your kids to add a colorant (a pinch should be enough) and their choice of essential oil.
- Pour the finished liquid soap into their travel size shampoo bottles.
You can have your kids design their own labels to stick onto their shampoo bottles.
We Will Serve The Lord- Coloring Page
 We Will Serve The Lord
(Coloring Page)
Coloring pages are a great way to end a Sunday School lesson. They can serve as a great take home activity. Or sometimes you just need to fill in those last five minutes before the end of class.
Preview and print this free printable coloring page by clicking on the link below.
Feel free to browse all of our Bible print-outs.
We Will Serve The Lord Two Ways
“As for me and my house, we will serve the LORD.” Joshua 24:15
This Bible verse has been memorized at some point in every children’s ministry. This is a great attitude to teach our kiddos and these crafts will be a constant reminder of this.
We Will Serve The Lord Door Hanger
This first craft is a simple hanging sign. After the children finish it they can place it on their bedroom door, on their bed post or even hang off the car rear view mirror.

Instructions
- Print the template on cardstock. (Template)
- Color and cut out all of the pieces..
- Glue the three large rectangular pieces together from biggest to smallest.
- Then glue on the Bible verse piece.
- Lastly cut out the space to be able to slip it onto the door knob.
If your kids like they can then add stickers, jewels, or draw on designs. Let them use their imagination.
We Will Serve The Lord Table Top
I found this version online and immediately fell in love with it. Sadly no template was available. So I decided to come up with my own. Place this finished craft on your mantle or table.
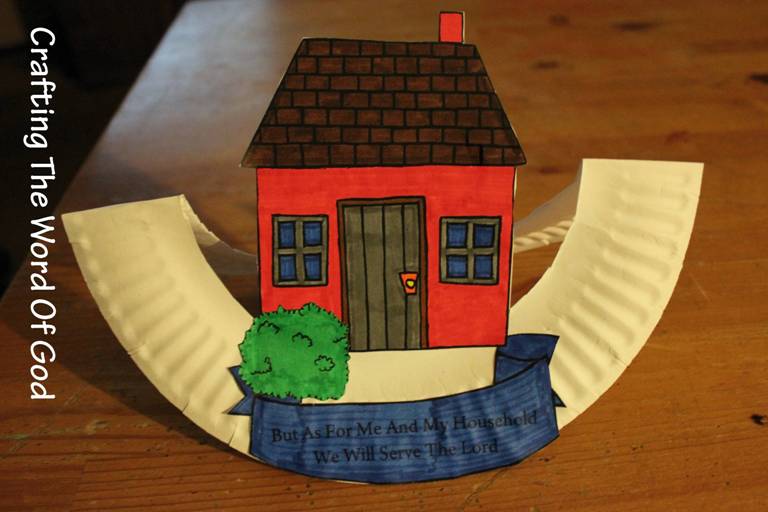
Instructions
- Print out the template. (Template)
- Color everything.
- At this point if you choose you can paint the paper plate.
- First glue the banner onto the paper plate.
- Then the house and finally the bush.
- Cut out the center circle of the plate cutting around the house.
- Then fold the plate in half to form the stand.

You must be logged in to post a comment.