Teachings
Fishers Of Men Puzzle- Activity Sheet
 Fishers Of Men Puzzle
(Activity Sheet)
Activity sheets are a great way to end a Sunday School lesson. They can serve as a great take home activity. Or sometimes you just need to fill in those last five minutes before the end of class.
Preview and print this free printable activity sheet by clicking on the link below.
Feel free to browse all of our Bible print-outs.
Jesus Washes The Disciples Feet
In this Bible story we see Christ humble Himself and give us a perfect example of how we should humble ourselves and serve others. At the same time the washing of the disciples feet reminds us of our need for our sins to be washed away by Christ.
What better way to make sure your kids remember this story then by having them make their very own soap.
Every time they wash up they will be reminded of Christ’s act of humility and the need to have their sins forgiven.

Snow Soap– (Quickest; Ideal For Young Children)
Materials
- 1 Ivory Bar, One Bar Will Be Enough For Two To Three Kids
- Small Plastic Containers
Instructions
- Cut a fresh Ivory bar into two to three pieces.
- Place the pieces of soap onto a microwavable plate.
- Heat the soap for 1 to 1.5 minutes. (The water molecules in the soap will begin to heat up and the soap will begin to inflate.)
- Allow the inflated soap to cool.
- Divide the inflated soap between the two to three kids.
- Have them crumble the inflated soap and place the pieces/powder into a small plastic container.
Your kids can place the container next to their sink at home.
Melt And Pour Soap– (Not Too Difficult; Requires One Day To Make)
Materials
- Melt And Pour Base, Can Be Purchased On Amazon Or Craft Stores
- Colorants (Colored Mica Powder Or Iron Oxides; Make Sure They Are Skin Safe) Or Look Up Natural Soap Colorants
- Additives (Oatmeal, Poppy Seeds, Dried Flower Petals, French Clay, Vitamin E Oil, Essential Oils, Fragrance Oils, Body Glitter)
- Small Plastic Containers Or Silicone Molds (Silicone Works Best)
- Rubbing Alcohol, In A Small Spray Bottle
- Plastic Spoons
- Plastic Bowls
Instructions
- Melt the melt and pour base in a microwavable container in 30 second burst until completely melted.
- Divide the melt and pour base between your kids into small plastic bowls, just enough to fill in their small plastic containers or silicone molds.
- Allow your kids to add a colorant and additives to their melt and pour base. Be careful with the additives and colorants, a little goes a long way. (If the soap starts to thicken before you are finished mixing in the colorants and additives, heat the soap base in the microwave for another 30 seconds.)
- Pour each child’s finished melt and pour base into their individual small plastic container or silicone mold.
- Spray a couple of squirts of rubbing alcohol on the top of the soap in order to pop all of the bubbles that have formed on the top of the soap.
- Allow the soap to harden completely. This can take anywhere from 20-40 minutes depending on the brand of melt and pour base that you have purchased.
Liquid Hand Soap– (Not Too Difficult; Requires Two Days To Make)
Materials
- 3 Cups Water, Distilled If Possible
- 2 Tablespoons Grated Fels-Naptha Soap or Any Other Hard Bar Soap, Soap With Added Moisturizes And Cream Like Dove Will Not Work
- 1/4 Teaspoon Washing Soda
- 1 Teaspoon Vegetable Glycerin
- Colorants (Colored Mica Powder Or Iron Oxides)
- 20 To 50 Drops Essential Oils (Clove, Lemon, Cinnamon, Eucalyptus, Rosemary, Lavender Or Tea Tree All Have Anti Fungal, Anti Bacterial Or Anti Viral Properties)
- Plastic Bowls
- Plastic Spoons
- Travel Size Shampoo Bottles
Instructions
- Combine the water, grated soap, and washing soda in a small sauce pan over medium heat. Heat until all of the ingredients have dissolved.
- Remove the saucepan from the heat and add in the glycerin and essential oils.
- Pour the liquid soap into a container or bowl, allow it to sit at room temperature for 6 to 12 hours or overnight. (Up to this point, you can do this at home and then let your kids finish the project in class. This way it will become a one day project.)
- After the liquid soap has had time to rest mix up the mixture using a whisk, a blender, an emulsion blender or have some fun and use your hands.
- Divide the liquid soap between your kids into small plastic bowls, just enough to fill in their travel size shampoo bottle.
- Allow your kids to add a colorant (a pinch should be enough) and their choice of essential oil.
- Pour the finished liquid soap into their travel size shampoo bottles.
You can have your kids design their own labels to stick onto their shampoo bottles.
Faith The Size Of A Mustard Seed
A mustard seed is incredibly small yet it is used by Christ to explain the power and importance of faith.
” 5 The apostles said to the Lord, “Increase our faith!” 6 And the Lord said, “If you had faith like a mustard seed, you would say to this mulberry tree, ‘Be uprooted and be planted in the sea’; and it would obey you.” Luke 17:5-6
“And He said to them, “Because of the littleness of your faith; for truly I say to you, if you have faith the size of a mustard seed, you will say to this mountain, ‘Move from here to there,’ and it will move; and nothing will be impossible to you.” Matthew 17:20

This craft can also be used for the parable of the mustard seed.
Instructions
- Print the template. (Template)
- Color the main image and the seed pods.
- Cut out the seed pods.
- Glue the seed pods onto the main image.
- Glue yellow beans onto the seed pods. You can also use black beans.
The Good Shepherd (The Lost Sheep)- Coloring Page
 The Good Shepherd (The Lost Sheep)
(Coloring Page)
Coloring pages are a great way to end a Sunday School lesson. They can serve as a great take home activity. Or sometimes you just need to fill in those last five minutes before the end of class.
Preview and print this free printable coloring page by clicking on the link below.
Feel free to browse all of our Bible print-outs.
Paper Plate Sheep
This cute and simple lamb craft will be a great add-on to any Bible lesson.


It can be used for:
- Cain and Abel’s offerings to God. (Genesis 4)
- Jesus as the Good Shepherd. (John 10:1-17)
- Jesus as The Lamb of God. (John 1:29-35)
- Jesus sacrificial death. (Isaiah 53)
- The shepherds visiting Christ on the night of His birth. (Luke 2:7-20)
- Israel’s practice of burnt offerings.
- The Passover. (Exodus 12)
- The story of David. (1 Samuel 17)
- False teachers as wolves in sheep’s clothing. (Matthew 7:15-20)
- The final judgement. (Matthew 25:32-33)
Instructions
- Print the template on card stock. (Template)
- Color and cut out the face and legs of the sheep.
- Optional: At this point you can cover the paper plate with either cotton balls or pop corn.
- Glue the head onto the paper plate.
- Finally glue the legs onto the paper plate. Make sure the back legs are slightly higher than the ones in front.
Samaritan Woman At The Well
The Samaritan woman was rejected by those around her because of her immorality. Jesus did not reject her. He sought her, had compassion for her and ministered to her by preaching to her the good news of salvation. Our kids need to understand that we also need to show the same love that Jesus showed to the Samaritan woman by sharing the gospel and telling others about Jesus.

The Instructions seem complex, but you can easily assemble the craft just by looking at picture.
Instructions
- Print the template on card stock. (Template)
- Color and cut out all of the pieces.
- Color a lollipop stick brown.
- Glue the 4 wooden posts together. You will be left with two wooden post pieces. On one of the sides for each post will be a piece with the black dot.
- Take the well piece and fold on the solid lines creating the creases that will help you assemble the well.
- Glue the sides of the well together by adding glue to the side tab of the well.
- Glue the wooden posts to the inside of the well.
- Glue the top of the well piece in place.
- Puncture the black dots on the wooden posts. Then with a toothpick make the hole larger.
- Stick the colored lollipop stick through each of the holes on the wooden posts.
- Glue two pieces of black or brown yarn/string to the back of the wooden barrel and the other end to the colored popsicle stick.
This craft can also be used for the stories of:
Joseph Betrayed By His Brothers (Genesis 37)
Rebekah Chosen As Isaac’s Bride (Genesis 24)
Moses Escape To Midian (Exodus 2)
The Parable Of The Lost Sheep Game
Your kids will not only have fun looking for the lost sheep. but they will be reinforcing the lesson of this parable.


Instructions
- Print the template. (Template)
- Color the first and second page.
- Cut out the bushes on the second page.
- Color in the back of the bushes you just cut out.
Fruit Of The Spirit (Jesus Is The Vine)- Coloring Page
 Fruit Of The Spirit
(Coloring Page)
Coloring pages are a great way to end a Sunday School lesson. They can serve as a great take home activity. Or sometimes you just need to fill in those last five minutes before the end of class.
Preview and print this free printable coloring page by clicking on the link below.
Feel free to browse all of our Bible print-outs.
The Lord Is My Shepherd
This psalm is probably the best known passage of the Old Testament. It is a testimony by David to the God’s faithfulness throughout his life. This psalm serves as a reminder to our kids that God watches over us and takes care of us.
“1 The Lord is my shepherd, I shall not want. 2 He makes me lie down in green pastures; He leads me beside quiet waters. 3 He restores my soul; He guides me in the paths of righteousness for His name’s sake. 4 Even though I walk through the valley of the shadow of death, I fear no evil, for You are with me; Your rod and Your staff, they comfort me. 5 You prepare a table before me in the presence of my enemies; You have anointed my head with oil; My cup overflows. 6 Surely goodness and loving kindness will follow me all the days of my life, And I will dwell in the house of the Lord forever.” Psalm 23

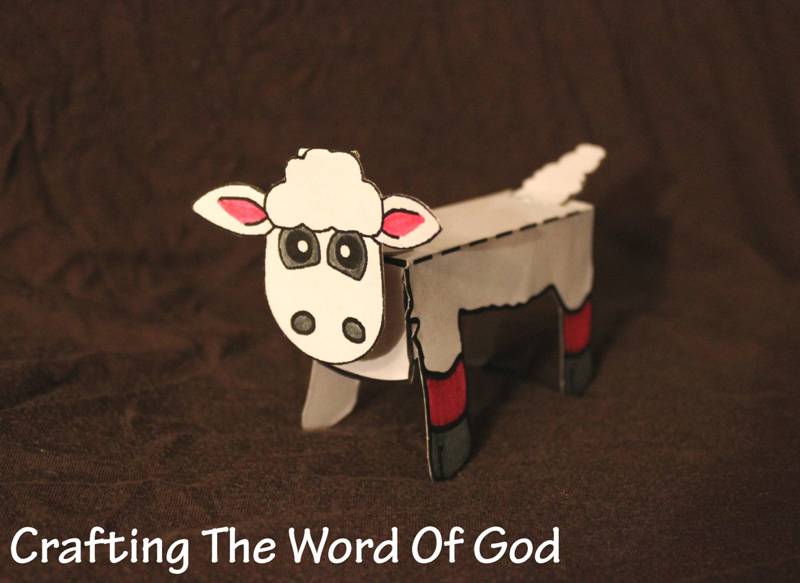
Instructions
- Print the template on card stock. (Template)
- Color and cut out all of the pieces.
- Assemble The Body: Fold on the solid and dashed lines. Glue the hinges to the sides of the legs. Slit both of the solid lines on the back of the sheep.
- Assemble The Head: Fold on the solid lines. Add glue to the underside of the middle square and fold the head back gluing it in place.
- Finally place the tail part of the head piece through the first slit of the back of the sheep and bring it up through the second slit.
This craft can also be used for other Bible stories.
- Cain and Abel’s offerings to God. (Genesis 4)
- Jesus as the Good Shepherd. (John 10:1-17)
- Jesus as The Lamb of God. (John 1:29-35)
- Jesus sacrificial death. (Isaiah 53)
- The shepherds visiting Christ on the night of His birth. (Luke 2:7-20)
- Israel’s practice of burnt offerings.
- The Passover. (Exodus 12)
- The story of David. (1 Samuel 17)
- False teachers as wolves in sheep’s clothing. (Matthew 7:15-20)
- The final judgement. (Matthew 25:32-33)
Jesus I Am…
This Bible craft is for teaching on the “I Am’s” of Jesus. Instead of asking our kids who they think Jesus is, we can lead them through scripture and show them who Jesus is. We should show them who Jesus Himself said He was. And that is exactly what this craft will accomplish.

Instructions
- Print the templates. (Template)
- Color in the first page.
- Cut out both circles.
- Make a small hole into the middle of the circles and stick a metal brad through it. Open and bend the legs.
- ← Previous
- 1
- …
- 3
- 4
- 5
- Next →

You must be logged in to post a comment.