peace
Abigail Keeps The Peace
“18 Then Abigail hurried and took two hundred loaves of bread and two jugs of wine and five sheep already prepared and five measures of roasted grain and a hundred clusters of raisins and two hundred cakes of figs, and loaded them on donkeys. 19 She said to her young men, “Go on before me; behold, I am coming after you.” But she did not tell her husband Nabal.” 1 Samuel 25:18-19

Instructions
- Print the template on cardstock. (Template)
- Color and cut out both pieces.
- Glue the Abigail piece to a large popsicle stick.
- Cut along the thin slit on the Davids army piece. This is where the image of Abigail will pop through.
The Armor Of God- Activity Sheet
 The Armor Of God
(Activity Sheet)
Activity sheets are a great way to end a Sunday School lesson. They can serve as a great take home activity. Or sometimes you just need to fill in those last five minutes before the end of class.
Preview and print this free printable activity sheet by clicking on the link below.
Feel free to browse all of our Bible print-outs.
Sandals Of Peace- Coloring Page
 Sandals Of Peace
(Coloring Page)
Coloring pages are a great way to end a Sunday School lesson. They can serve as a great take home activity. Or sometimes you just need to fill in those last five minutes before the end of class.
Preview and print this free printable coloring page by clicking on the link below.
Feel free to browse all of our Bible print-outs.
Sandals Of Peace
“…and having shod your feet with the preparation of the gospel of peace.” Ephesians 6:15

Instructions
- Trace a your kiddos shoes onto cardboard. Cut it out using large scissors or a utility knife. This step should be done by an adult. Poster board will work as well and will be easier to cut.
- Next glue a sheet of black, gray or brown foam onto the bottom of each cut out. Cut of any excess foam so that you are left with the original cardboard shape.
- Then do the same thing on the other side with a sheet of construction paper.
- Have the child place his foot on the sandal base. Take a 1 yard ribbon (1 to 1 1/2 in. wide) and place one end under the cutout, wrap over the child’s foot, and tuck it back under the sandal. Cut of the extra ribbon. Do this for both cut outs. (You will need two 1 yard ribbons).
- Next add glue to the ends of the ribbons you just measured. Place it over the child’s foot again and tuck the ends under the cut out. Have the child slowly remove his foot to allow the ribbon to dry. If you would like extra support glue the ribbon first onto a piece of paper or cardstock. Then glue it onto the sandal base. (This is for the front of the foot.)
- Glue the ribbon that is left to the cut out. Lay the ribbon in front of you. Find the center. Glue on to the cut out, on the spot right between the end of the foot’s arch and the beginning of the heel. Do this for both cut outs.
- After the sandals have dried have the child place his feet in them. Then wrap the ribbon in front of the leg and then back around the leg making a criss-cross pattern. (As shown in the picture below.)
- After criss-crossing 3 times, tie the ribbon in the back to hold it up. Cut of any excess ribbon.

I have included the words SANDALS and PEACE. (Template)
If your kiddos choose they can glue one of the words to each sandal.
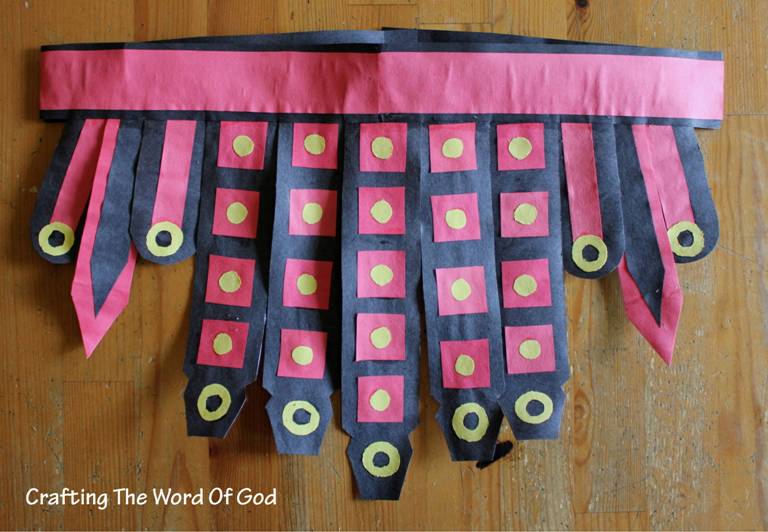
Armor Of God
The armor of God described in the book of Ephesians is a popular theme for Sunday School lessons and Vacation Bible Schools. Kids not only like making the armor, but they enjoy putting it on and playing around with it.
This past week I decided to come up with my own version of the armor of God. For the next six days I will be posting crafts on the complete armor of God. Each day will bring a different part of the armor. I’m sure your kiddos will love them.

“10 Finally, be strong in the Lord and in the strength of His might. 11 Put on the full armor of God, so that you will be able to stand firm against the schemes of the devil.” Ephesians 6:10-11


If you happen to have a Sunday School or Vacation Bible School armor of God theme and you wish to send me pics of your kiddos making or wearing the armor, I’d be glad to put them on my blog.
White Dove

This craft can be done for different bible stories and adapted for each one. It is very versatile. It can be used for:
- Teaching children the story of Noah. (Genesis 6-9) You can add a branch to the birds mouth for this story.
- Teaching children when Jesus was baptized. (Matthew 3)
- Or you can teach about who the Holy Spirit is.
If you have any other ideas about what other bible stories this craft can be applied to I would love to read them in the comments section.
Instructions
- Print out the templates. (Template)
- Cut out the body, the wings and the feathers.
- Snip each individual feather around the border of the feather. (For a nice effect, before snipping the feathers, crumble them up, then snip each individual feather around the border).
- Then glue the feathers onto each wing. (Eight on the bottom and six on the top).
- Glue the wings to the body.
- Finally color in the beak. If the child chooses he can draw on the feet.

You must be logged in to post a comment.