OT Crafts
The Perfect Homemade Playdough
Are you looking for the perfect homemade playdough recipe. Look no more.
This playdough recipe is simple and the results are fantastic; silky and smooth playdough.

If you are looking for a recipe that does not include cream of tartar, good luck. I have spent years looking for that elusive unicorn with no luck. If you find a recipe that does not include cream of tartar the results are not as ideal. The dough is either too crumbly, sticky or lumpy.
Keep your eyes out for when cream of tartar goes on sale in your local supermarket or buy it in bulk on Amazon. The extra cost is really worth it.
This recipe will make enough playdough for four medium sized balls or you can make large batches of a single color.
Ingredients
- 2 cups flour
- 2/3 cup salt
- 4 teaspoons cream of tartar
- 2 cups water
- 2 tablespoon vegetable oil
- Food Coloring
- Add the flour, salt, and cream of tartar into a large saucepan.
- Add in the oil and water. Make sure that there are no lumps.
- If you will be doing one large batch add in your food coloring until you get the desired color intensity. If you will be doing a variety of colors leave the food coloring out.
- Place the large saucepan on medium heat and continually stir. You know it is done when it forms into a ball and pulls away from the sides of the saucepan.
- If you did not make a large batch, divide the dough into four equal pieces.
- Add a different color of food coloring to each piece.
- Kneed the dough to incorporate the food coloring.

Lying Lips Are An Abomination To The Lord
God hates it when we lie! When we lie we are going against His very nature John 14:6. God hates lying so much that He included it as one of the Ten Commandments.
We can clearly see how serious God is about lies and this is what we want our kids to learn as well. They need to understand that God hates it when we lie. That lying is a serious sin.
“Lying lips are an abomination to the Lord, But those who deal faithfully are His delight.” Proverbs 12:22
It ruins friendships and characters. It hurts others and it can even influence others to sin as well.
Take this opportunity to correct the worlds false view of lying. The world believes in half-truths and “white” lies, but Gods Word shows us that a lie is a lie. They need to comprehend that when we lie we hurt others.
Tell your kids that it takes love to tell someone the truth, even when they know they will be hurt by their response; making an emphasis on the fact that the truth needs to be said lovingly. Teaching them that we need to practice sincere honesty with our family, friends, and in the church.

Instructions
- Print the template onto card stock. (Template)
- Color and cut out all of the pieces.
- Take the tongue piece and fold on the solid line, creating a crease.
- Glue the tongue to the lips.
- If your have boys they can glue on the mustache.
- Glue a large popsicle stick to the back of the lips. It will serve as a handle.
This craft might look silly, but it will help your kids remember this important biblical truth.
Adam And Eve Paper Dolls
Looking for a new way to tell the story of Adam and Eve? Well why not tell the story using paper dolls. The best part about these dolls is that the children can make them as a craft and then use them to retell the story to their friends and family.
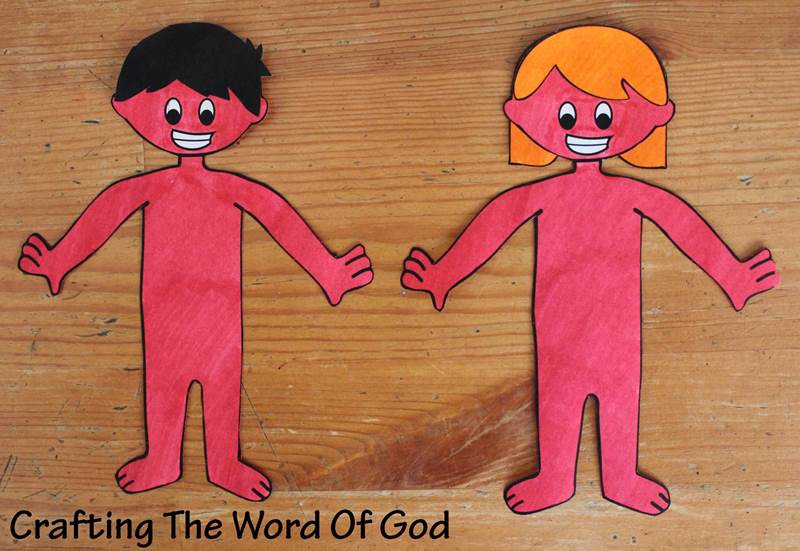
Adam And Eve Created

Adam And Eve When They Fell
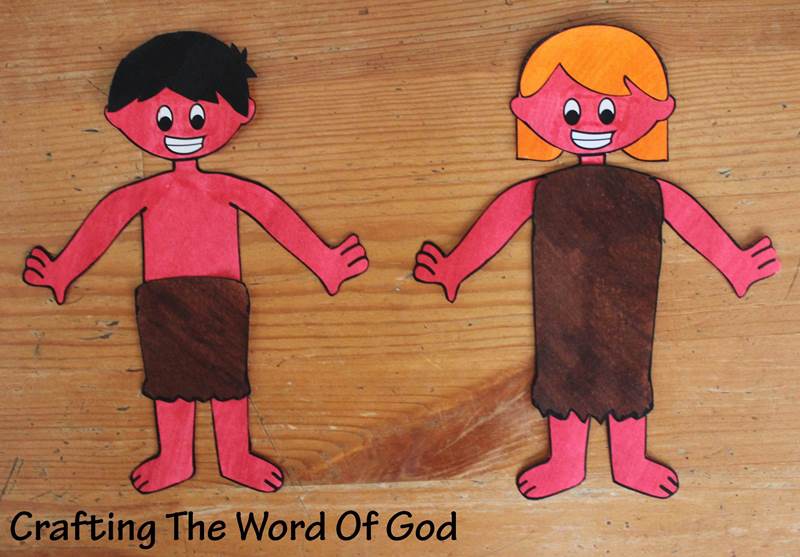
Adam And Eve When God Clothed Them
Instructions
- Print the template. (Template)
- Color and cut out all of the pieces.
- Glue the hair pieces to the bodies.
- Using double sided tape stick on the fig leaves to the bodies when you reach that part of the story.
- Using double sided tape stick on the clothes over the fig leaves when you reach that part of the story.
If you like you can have three separate dolls for both Adam and Eve. A separate doll for each part of the story.
The Plague Of Frogs
Todays crafts are based on the second plague on Egypt, the plague of frogs.
“So Aaron stretched out his hand over the waters of Egypt, and the frogs came up and covered the land of Egypt.” Exodus 8:6
The Plague Of Frogs Mask

Instructions
- Print the template onto cardstock. (Template)
- Color all of the pieces.
- Cut out all of the pieces leaving a white border around each piece.
- Glue each piece to another sheet of cardstock. This will give the mask structure.
- Now cut out all of the pieces again without leaving any white border, including the mouth.
- Glue the small circle to the center of the larger circle.
- Glue the finished eye pieces to the frog face and finally glue on the large popsicle stick.
The Plague Of Frogs Jumpy Frog

Instructions
- Print the template. (Template)
- Color and cut out all of the pieces.
- Fold the tongue along the creases into a fan fold.
- Glue the tongue to the mouth of the frog.
- Fan fold each of the legs.
- Finally glue the legs to the frogs body.
You can also hang this frog from the wall and the legs will dangle.
Frog Infestation
Cover your walls and windows with these cute cut outs.


Instructions
- Print the template. On one side print the frog template and on the other side print a design pattern. You can also have a simple frog by not printing a design pattern on the second side. (Template)
- Color the side with the pattern. In case you are making a simple frog, color in the blank side with whatever design or pattern you wish.
- Cut out the rectangle with the frog pattern on it.
- Fold along the dashed lines. First in half creating a rectangle, then half again to make a square, and finally again to make a triangle.
- Cut out the empty space around the frog pattern.
- Open the folds up and you will have four frogs.
Jacobs Ladder
“11 When he reached a certain place, he stopped for the night because the sun had set. Taking one of the stones there, he put it under his head and lay down to sleep. 12 He had a dream in which he saw a stairway resting on the earth, with its top reaching to heaven, and the angels of God were ascending and descending on it. 13 There above it stood the Lord, and he said: “I am the Lord, the God of your father Abraham and the God of Isaac. I will give you and your descendants the land on which you are lying. 14 Your descendants will be like the dust of the earth, and you will spread out to the west and to the east, to the north and to the south. All peoples on earth will be blessed through you and your offspring. 15 I am with you and will watch over you wherever you go, and I will bring you back to this land. I will not leave you until I have done what I have promised you.” Genesis 28:11-15
God kept His promises that He gave to Abraham. God kept His promises that He gave to Isaac. And here we see a reminder of the kept promises He gave to Jacob in a dream.

Instructions
- Print the template. (Template)
- Color and cut out all of the pieces.
- Fold the long piece on the solid lines creating creases. This will be the staircase/ ladder.
- Glue the ground/earth piece to one side of the staircase piece.
- On the other side of the staircase glue on the clouds.
- Finally glue on the angels.
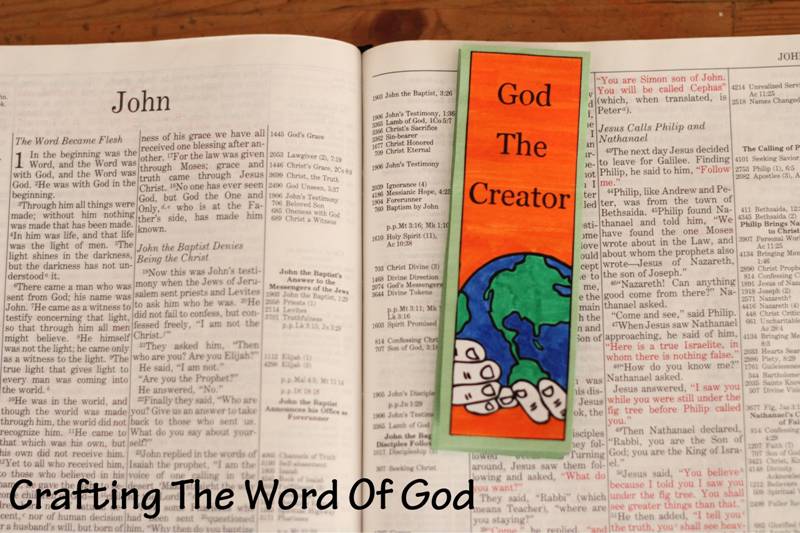
In The Beginning Bookmark
“In the beginning, God created the heavens and the earth.” Genesis 1:1
This cute bookmark will serve as a constant reminder that God is the creator and sustainer of everything.

Instructions
- Print the templates. (Template)
- Color and cut out all of the pieces.
- Grab the blank rectangle and trace it twice onto construction paper.
- Cut out the rectangles.
- Glue the “in the beginning” template onto one of the construction paper cut outs.
- Glue the cloud and z’s to the back of the large template. In between the 5 middle spaces.
- After the cloud and z’s have dried, on the other side, fold on the solid lines creating a crease. Do this for all of the solid lines. The rectangle will fold in on itself into one visible rectangle.
- Add glue to the back of the 1st day square and stick it on the back of the “in the beginning” piece.
- Finally add glue on the empty rectangle, right after the sixth day, and stick it onto the last construction paper piece.
Your kids can now go over the story of creation at any time and will have a wonderful tool to share the story with their friends.
Samuels Birth
God hears His children’s prayers. All Hannah ever wanted was a baby and in this story we see God lovingly answer the prayer of one of His children.


Instructions
- Print the templates. (Template)
- Color and cut out all three pieces.
- Glue the pieces onto construction paper. Make sure to use the same color for all of the pieces.
- Cut the templates from the construction paper.
- Take the larger piece and fold on the solid line creating a crease.
- Finally glue the hands to the other side of the larger piece.
When the sides are closed Hannah’s hands will be together in prayer and when you open the hands she will be holding baby Samuel.
Elijah And The Prophets Of Baal
“36 At the time of the offering of the evening sacrifice, Elijah the prophet came near and said, “O Lord, the God of Abraham, Isaac and Israel, today let it be known that You are God in Israel and that I am Your servant and I have done all these things at Your word. 37 Answer me, O Lord, answer me, that this people may know that You, O Lord, are God, and that You have turned their heart back again.”38 Then the fire of the Lord fell and consumed the burnt offering and the wood and the stones and the dust, and licked up the water that was in the trench. 39 When all the people saw it, they fell on their faces; and they said, “The Lord, He is God; the Lord, He is God.” 1 Kings 18:36-39
This craft will help your kids remember that God is the one and only true living God.

Instructions
- Print the template onto cardstock. (Template)
- Color and cut out all of the pieces.
- Fold all of the pieces along the solid lines creating creases.
- Finally assemble the craft by gluing the pieces in place. (Add glue to the tabs of the border and lay the hexagon on top of the tabs. Then the alter and finally the Elijah figure).
Noahs Ark Doorknob Hanger
One of my favorite Bible stories to make crafts for is the story of Noah’s ark, There are dozens and dozens of ideas you can play off of. The rainbow, the ark, the dove, Noah himself.
Here’s a cute craft your kids will enjoy making. It will remind them of this biblical story every time they see it.

Instructions
- Print the template onto cardstock. You can use regular copy paper just be careful not to rip the craft. You can glue each piece onto construction paper for strength. (Template)
- Color and cut out all of the pieces.
- Add glue to the rectangle on the rainbow. Center the ark making sure the top of the rectangle aligns with the top of the ark.
- Glue on the wave, then the long strip.
- Finally glue on the animals.
You can adapt this craft any way you choose.
- Add glitter to the rainbow.
- Leave the wave off and color the long strip brown.
- You can use stickers or foam animals.
- Add on this cute Noah figure. (Template)

You must be logged in to post a comment.