Egypt
Roar Bible Crafts

These are the crafts that can be used with the Group’s Roar V.B.S. program.
Although most Vacation Bible School curriculum programs provide or sell their own Bible crafts, many times they have nothing to do with the Bible story of the day or not much thought went into designing them in the first place.
My hope is that these crafts will help make planning your Vacation Bible School a little less stressful.
Day 1: The Israelites Are Slaves To The Egyptians (Exodus 1;5;6)
Moses In The Basket Coloring Page
Day 2: God Sends Plagues On Egypt (Exodus 7:14-12:32)
The Plague Of Blood Color By Number
The Plague Of Lice, Gnats, Fleas
The Plague Of Boils Coloring Page
Day 3: The Israelites Enter The Wilderness (Exodus 14-17)
Crossing The Red Sea Coloring Page
Manna From Heaven Coloring Page
Israelites Complain Coloring Pages
Day 4: Jesus Dies And Comes Back To Life (John 16-21)
Stained Glass Window Sun Catcher
Miraculous Catch Of Fish Coloring Page
Miraculous Catch Of Fish Puzzle
Day 5:The Israelites Build A Memorial To Remember Gods Goodness (Joshua 3-4)
Moses In The River

Instructions
- Print the template on cardstock. (Template)
- Color and cut out all three pieces.
- Glue the Moses piece onto the middle of the long piece.
- On the largest piece fold along the dotted lines.
- Again on the largest piece, cut the two small dotted lines (located in the river).
- Stick each side of the long piece through each of the small flaps that you created in step 5.
Moses In The River Puzzle- Activity Sheet
 Moses In The River Puzzle
(Activity Sheet)
Activity sheets are a great way to end a Sunday School lesson. They can serve as a great take home activity. Or sometimes you just need to fill in those last five minutes before the end of class.
Preview and print this free printable activity sheet by clicking on the link below.
Feel free to browse all of our Bible print-outs.
10 Plagues Of Egypt Wheel
Use this wheel to help your kids learn the 10 plagues of Egypt.
“4 When Pharaoh does not listen to you, then I will lay My hand on Egypt and bring out My hosts, My people the sons of Israel, from the land of Egypt by great judgments. 5 The Egyptians shall know that I am the Lord, when I stretch out My hand on Egypt and bring out the sons of Israel from their midst.” Exodus 7:4-5
Instructions
- Print the template on card stock. (Template)
- Color and cut out both circles.
- Make a small hole into the middle of the circles and stick a metal brad through it. Open and bend the legs.
Pharaohs Head Dress 2
This craft is my second pharaoh’s head dress. If you would like a simpler version of this craft take a quick look at it. HERE
This craft can be done for different Bible stories and adapted for each one. It can be used for:
- Abraham’s move to Egypt and his deception towards the pharaoh.
- Joseph becomes second in command over Egypt.
- God freeing His people through Moses.
Instructions
- Print the first two pages of the template on blue construction paper, the second page on yellow construction paper and the last page on white card stock. The template is blank in case you would like to print the template all white and have your kids color it in. (Template)
- Cut out all of the pieces.
- Glue the yellow pieces onto the two large pieces.
- Attach both blue pieces with the small white rectangular piece.
- Next glue on the snake head to the head dress.
- Finally attach the head dress to the child’s head using the white stripes.
Crossing The Red Sea- Coloring Page
 Crossing The Red Sea
(Coloring Page)
Coloring pages are a great way to end a Sunday School lesson. They can serve as a great take home activity. Or sometimes you just need to fill in those last five minutes before the end of class.
Preview and print this free printable coloring page by clicking on the link below.
Feel free to browse all of our Bible print-outs.
The Plague Of Boils- Coloring Page
(Coloring Page)
Coloring pages are a great way to end a Sunday School lesson. They can serve as a great take home activity. Or sometimes you just need to fill in those last five minutes before the end of class.
Preview and print this free printable coloring page by clicking on the link below.
Feel free to browse all of our Bible print-outs.
The Plague Of Frogs
Todays crafts are based on the second plague on Egypt, the plague of frogs.
“So Aaron stretched out his hand over the waters of Egypt, and the frogs came up and covered the land of Egypt.” Exodus 8:6
The Plague Of Frogs Mask
Instructions
- Print the template onto cardstock. (Template)
- Color all of the pieces.
- Cut out all of the pieces leaving a white border around each piece.
- Glue each piece to another sheet of cardstock. This will give the mask structure.
- Now cut out all of the pieces again without leaving any white border, including the mouth.
- Glue the small circle to the center of the larger circle.
- Glue the finished eye pieces to the frog face and finally glue on the large popsicle stick.
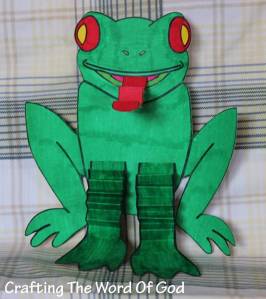
The Plague Of Frogs Jumpy Frog
Instructions
- Print the template. (Template)
- Color and cut out all of the pieces.
- Fold the tongue along the creases into a fan fold.
- Glue the tongue to the mouth of the frog.
- Fan fold each of the legs.
- Finally glue the legs to the frogs body.
You can also hang this frog from the wall and the legs will dangle.
Frog Infestation
Cover your walls and windows with these cute cut outs.
Instructions
- Print the template. On one side print the frog template and on the other side print a design pattern. You can also have a simple frog by not printing a design pattern on the second side. (Template)
- Color the side with the pattern. In case you are making a simple frog, color in the blank side with whatever design or pattern you wish.
- Cut out the rectangle with the frog pattern on it.
- Fold along the dashed lines. First in half creating a rectangle, then half again to make a square, and finally again to make a triangle.
- Cut out the empty space around the frog pattern.
- Open the folds up and you will have four frogs.
The Plague Of Darkness
Today’s craft is based on the ninth plague on Egypt, the plague of darkness.
“22 So Moses stretched out his hand toward the sky, and there was thick darkness in all the land of Egypt for three days. 23 They did not see one another, nor did anyone rise from his place for three days, but all the sons of Israel had light in their dwellings.” Exodus 10:22-23
Instructions
- Print the template onto cardstock. (Template)
- Cut out the templates.
- Glue all the pieces onto black construction paper.
- Cut out the templates from the construction paper.
- Glue a pair of eyes onto one of the frames.
- Finally glue on the side pieces.
The Plague Of Locusts
Today’s crafts are based on the eighth plague on Egypt, the plague of locusts.
“13 So Moses stretched out his staff over the land of Egypt, and the Lord directed an east wind on the land all that day and all that night; and when it was morning, the east wind brought the locusts. 14 The locusts came up over all the land of Egypt and settled in all the territory of Egypt; they were very numerous. There had never been so many locusts, nor would there be so many again.15 For they covered the surface of the whole land, so that the land was darkened; and they ate every plant of the land and all the fruit of the trees that the hail had left. Thus nothing green was left on tree or plant of the field through all the land of Egypt.” Exodus 10:13-15
Clothespin Grasshopper
Instructions
- Color a wooden clothespin green using a permanent marker.
- Print the template onto cardstock. (Template)
- Color and cut out every piece.
- Glue each piece to s piece of green construction paper.
- Cut out each piece from the construction paper.
- Glue the wings to the the clothespin, then the covering over the wings.
- Take the bracket piece and fold it on the solid line making a crease.
- Glue the smaller square to the back of the grasshoppers face and the other end to the clothespin.
- Grab two green chenille stems/ pipe cleaners. One should be 5″ (the front legs) and the other should be 7″ (the back legs).
- With a hot glue gun, glue both pieces in place. (The shorter piece will go into the larger hole of the clothespin and the longer piece will go into the small hole of the clothespin).
Pop Up Grasshopper
This craft is a repeat, but I wanted to include it.
Instructions
- Print the template onto a sheet of cardstock. (Template)
- Cut out all of the pieces leaving a border of cardstock around each piece.
- Glue the pieces onto a sheet of black construction paper.
- Cut out all of the pieces.
- Glue each wing to the back of the grasshopper pieces.
- Take the rectangle piece and fold along both solid lines, making two creases.
- Add glue to one side of the rectangle piece and stick it on one of the grasshopper pieces, right between the thorax and the abdomen.
- Do the same thing with the other piece of grasshopper, making sure to line up both grasshopper pieces. The legs will now be able to hold up the entire grasshopper.


You must be logged in to post a comment.