mask
Reindeer Mask
 Instructions
- Print the template on cardstock. Use the size appropriate for the age of your kids. (Template)
- Color and cut out all of the pieces.
- Cut out the eye holes.
- Glue the antlers onto the reindeer head.
- To finish assembling the mask either, glue a large popsicle stick to the bottom of the mask to be used as a handle, or use the provided straps to be able to secure it on your kids head.
Thanksgiving Turkey Mask 1
A simple turkey mask for your Thanksgiving holiday celebration.

Instructions
- Print the template on card stock. (Template)
- Color and cut out the mask, including the eyes.
- Glue a large popsicle stick to the bottom of the mask.
Lazarus Mask
Your kids will quickly be able to make this Lazarus mask to go with the story of Jesus raising Lazarus from the dead.

Instructions
- Print the template on card stock. (Template)
- Cut out the mask including the mouth and eyes.
- Glue a large popsicle stick to the bottom of the mask.
Bible Beard
A simple beard your kids can make for a variety of Bible stories.

Instructions
- Print the template onto card stock. (Template)
- Color and cut out the beard.
- There are two ways of wearing the beard. 1 Glue the beard to a large popsicle stick. 2 With a one-hole punch, make two holes on each side of the beard. Then add a long piece of yarn through each hole.
Elijah Taken Up To Heaven Mask
“As they were going along and talking, behold, there appeared a chariot of fire and horses of fire which separated the two of them. And Elijah went up by a whirlwind to heaven.” 2 Kings 2:11
This craft is a great reminder of the story of Elijah being taken up to heaven in a flaming chariot.

Instructions
- Print the template on card stock. Or glue the template onto a sheet of construction paper for strength. (Template)
- Color and cut out the mask.
- Cut out the nostrils. These will be the eye holes.
- Glue a large popsicle stick to the back of the mask.
- If you want you can add glitter to the flames.
Paper Plate Scarecrow

Instructions
- Print the template. (Template)
- Paint a paper plate yellow, light brown or skin color.
- Color and cut out all of pieces.
- Assemble the flower and glue it onto the hat.
- To the bottom of the hat, glue strips of yellow, orange or gray construction paper.
- Glue the finished hat to the top of the paper plate.
- Next glue on the nose and cheeks.
- Finish the craft by using a permanent marker to draw on the eyes, details to the nose and the mouth.
If you choose you can include the bow or leave out the flower.
The Plague On Livestock
Today’s craft is based on the fifth plague on Egypt, the plague on livestock.
“So the Lord did this thing on the next day, and all the livestock of Egypt died; but of the livestock of the sons of Israel, not one died.” Exodus 9:6
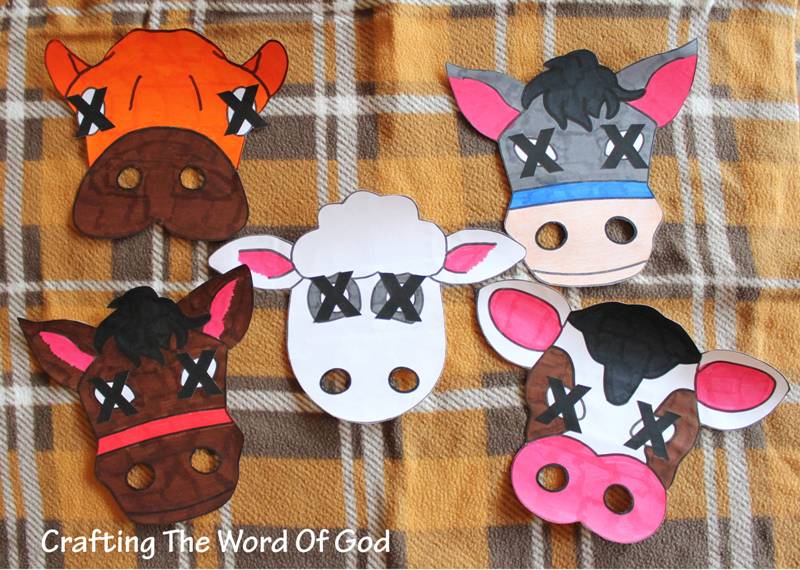
Instructions
- Print the templates onto cardstock. (Template)
- Color and cut out the masks. Let your kids choose which mask they would like to make.
- To finish the mask you can either punch out a hole on both sides of the mask and attach a piece of yarn or you can glue a large popsicle stick to the mask as a handle.
Blind Man Healed Mask
This craft will help your kiddos remember the story of Jesus healing a blind man. On one side of the mask you have a sad face with bandages on his eyes. This side symbolizes the blind man before he was healed. And on the other side you have a happy face with a big smile who has now been healed by the miraculous power of Christ.


Instructions
- Print and color the templates. (Template)
- Cut out both faces and the bandages. Each child will need two bandages.
- Glue each face onto a piece of construction paper. Both pieces of construction paper should be the same color.
- Cut out the faces again, leaving a small border of construction paper.
- Grab the happy face and place it facing down. Glue on a large popsicle stick for a handle.
- While this is drying glue on the bandages to the eyes of the sad face.
- Finally glue the sad face to the back of the happy face. The popsicle stick will be sandwiched in between both faces.
Balaam’s Donkey
We can be very stubborn when we want to do things our way. Many times this happens when we are doing something wrong.
This craft will help the kiddos remember to always listen to what God says and not be as stubborn as Balaam. And like Balaam’s donkey, to always speak up when it comes to standing up for God’s truth.

Instructions
- Print and color the template. (Template)
- Cut it out and glue it onto a piece on cardstock or construction paper.
- Cut out the template from the cardstock or construction paper.
- Glue on two large googly eyes and black string for the hair.
- Finally glue on a large craft stick for a handle.
You can also use this craft for Jesus’ entry into Jerusalem or Mary and Joseph’s trip to Bethlehem.
Daniel In The Lions Den
Daniel got in trouble for obeying and worshipping God. Even though his life was in danger Daniel had to trust God and placed his faith in Him. God was always with Daniel, He never abandoned him. Through this trial God was glorified and His name was proclaimed throughout the kingdom.
This is the lesson that we want our kid’s to learn; to learn to trust God. Even when things get difficult God doesn’t abandon us.
“When you pass through the waters, I will be with you; And through the rivers, they will not overflow you.” Isaiah 43:2

Instructions
- Print the templates. (Template)
- Paint a paper plate orange or yellow.
- Color the lions head the same color as the plate.
- Color and cut out the strips for the mane. If you prefer you can use a strip as a template and trace it on construction paper.
- Glue the strips of construction paper around the rim of the painted paper plate.
- Glue the lions face onto the paper plate, centered.
- Cut out the eyes of the lion.
- Finally glue a large popsicle stick onto the bottom of the plate for a handle.

You must be logged in to post a comment.