Moses
The Plague Of Frogs
Todays crafts are based on the second plague on Egypt, the plague of frogs.
“So Aaron stretched out his hand over the waters of Egypt, and the frogs came up and covered the land of Egypt.” Exodus 8:6
The Plague Of Frogs Mask

Instructions
- Print the template onto cardstock. (Template)
- Color all of the pieces.
- Cut out all of the pieces leaving a white border around each piece.
- Glue each piece to another sheet of cardstock. This will give the mask structure.
- Now cut out all of the pieces again without leaving any white border, including the mouth.
- Glue the small circle to the center of the larger circle.
- Glue the finished eye pieces to the frog face and finally glue on the large popsicle stick.
The Plague Of Frogs Jumpy Frog

Instructions
- Print the template. (Template)
- Color and cut out all of the pieces.
- Fold the tongue along the creases into a fan fold.
- Glue the tongue to the mouth of the frog.
- Fan fold each of the legs.
- Finally glue the legs to the frogs body.
You can also hang this frog from the wall and the legs will dangle.
Frog Infestation
Cover your walls and windows with these cute cut outs.


Instructions
- Print the template. On one side print the frog template and on the other side print a design pattern. You can also have a simple frog by not printing a design pattern on the second side. (Template)
- Color the side with the pattern. In case you are making a simple frog, color in the blank side with whatever design or pattern you wish.
- Cut out the rectangle with the frog pattern on it.
- Fold along the dashed lines. First in half creating a rectangle, then half again to make a square, and finally again to make a triangle.
- Cut out the empty space around the frog pattern.
- Open the folds up and you will have four frogs.
The Plague On The Firstborn
Today’s crafts are based on the tenth and last plague on Egypt, the plague on the firstborn.
“4 Moses said, “Thus says the Lord, ‘About midnight I am going out into the midst of Egypt, 5 and all the firstborn in the land of Egypt shall die, from the firstborn of the Pharaoh who sits on his throne, even to the firstborn of the slave girl who is behind the millstones; all the firstborn of the cattle as well. 6 Moreover, there shall be a great cry in all the land of Egypt, such as there has not been before and such as shall never be again.” Exodus 11:4-6
The Plague On The Firstborn Coffin And Sarcophagus


Instructions
- Print the template onto cardstock. (Template)
- Color in the templates.
- Cut out all three pieces.
- Fold both of the larger pieces on the dashed lines creating creases.
- Assemble both of the large pieces.
- Finally glue the piece with the face to the rectangular piece.
The Plague On The Firstborn Blood On Doorpost

Instructions
- Print the template. (Template)
- Color the template.
- Glue strips/ pieces of red tissue or construction papper to the image.
You can also use paint or glitter instead of tissue/ construction paper.
For a variation of this craft you can tape crumpled large sheets of red tissue or construction paper to an actual door post. This way when your kids see it it will remind them of the Bible story.
The Plague Of Darkness
Today’s craft is based on the ninth plague on Egypt, the plague of darkness.
“22 So Moses stretched out his hand toward the sky, and there was thick darkness in all the land of Egypt for three days. 23 They did not see one another, nor did anyone rise from his place for three days, but all the sons of Israel had light in their dwellings.” Exodus 10:22-23

Instructions
- Print the template onto cardstock. (Template)
- Cut out the templates.
- Glue all the pieces onto black construction paper.
- Cut out the templates from the construction paper.
- Glue a pair of eyes onto one of the frames.
- Finally glue on the side pieces.
The Plague Of Locusts
Today’s crafts are based on the eighth plague on Egypt, the plague of locusts.
“13 So Moses stretched out his staff over the land of Egypt, and the Lord directed an east wind on the land all that day and all that night; and when it was morning, the east wind brought the locusts. 14 The locusts came up over all the land of Egypt and settled in all the territory of Egypt; they were very numerous. There had never been so many locusts, nor would there be so many again.15 For they covered the surface of the whole land, so that the land was darkened; and they ate every plant of the land and all the fruit of the trees that the hail had left. Thus nothing green was left on tree or plant of the field through all the land of Egypt.” Exodus 10:13-15
Clothespin Grasshopper

Instructions
- Color a wooden clothespin green using a permanent marker.
- Print the template onto cardstock. (Template)
- Color and cut out every piece.
- Glue each piece to s piece of green construction paper.
- Cut out each piece from the construction paper.
- Glue the wings to the the clothespin, then the covering over the wings.
- Take the bracket piece and fold it on the solid line making a crease.
- Glue the smaller square to the back of the grasshoppers face and the other end to the clothespin.
- Grab two green chenille stems/ pipe cleaners. One should be 5″ (the front legs) and the other should be 7″ (the back legs).
- With a hot glue gun, glue both pieces in place. (The shorter piece will go into the larger hole of the clothespin and the longer piece will go into the small hole of the clothespin).
Pop Up Grasshopper
This craft is a repeat, but I wanted to include it.

Instructions
- Print the template onto a sheet of cardstock. (Template)
- Cut out all of the pieces leaving a border of cardstock around each piece.
- Glue the pieces onto a sheet of black construction paper.
- Cut out all of the pieces.
- Glue each wing to the back of the grasshopper pieces.
- Take the rectangle piece and fold along both solid lines, making two creases.
- Add glue to one side of the rectangle piece and stick it on one of the grasshopper pieces, right between the thorax and the abdomen.
- Do the same thing with the other piece of grasshopper, making sure to line up both grasshopper pieces. The legs will now be able to hold up the entire grasshopper.
The Plague Of Hail Mobile
Today’s craft is based on the seventh plague on Egypt, the plague of hail.
“Moses stretched out his staff toward the sky, and the Lord sent thunder and hail, and fire ran down to the earth. And the Lord rained hail on the land of Egypt.” Exodus 9:23

Instructions
- Print the templates onto cardstock. (Template)
- Color and cut out all of the pieces.
- Cut three pieces of yarn/string. (2- 10″ pieces and 1- 12″ piece.) White, tan or blue sting works best.
- With a one hole punch, punch three holes, even spacing, on the bottom of the cloud.
- Place one of the shorter strings through one of the side holes and tie the string end on itself. The bulge from the knot will keep the string from falling completely out of the hole. Do the same thing with the longest piece and then with the final short piece.
- Glue the hail onto the string; three on each side of a string; six total for each string. This way when the mobile is hanging on a wall, if the strings twist you can still see the hail.
- Add glue to the cloud and then add on cotton balls until the whole cloud is completely covered. You can cover both sides of the cloud with cotton balls if you will be hanging it from the ceiling or a doorway.
Add a loop to the back of the cloud using yarn and your kids can now hang it on the wall.
The Plague Of Boils
Today’s crafts are based on the sixth plague on Egypt, the plague of boils.
“10 So they took soot from a kiln, and stood before Pharaoh; and Moses threw it toward the sky, and it became boils breaking out with sores on man and beast. 11 The magicians could not stand before Moses because of the boils, for the boils were on the magicians as well as on all the Egyptians.” Exodus 9:10-11
Appearing Boils


Instructions
- Print the templates onto regular copy paper. Do not use cardstock. Print the main image on one side, then the boils on the other side of the same paper. (Template)
- Lay one or two sheets of newspaper on your table.
- Have your kids color in the main image using markers. DO NOT color the body of the figure with markers.
- Next lightly color in the body with a color pencil.
- Trace the outline of the figure with regular glue and allow the glue to dry.
- When the glue has dried color in the boils on the back with markers.
- In a small plastic container add about 1 teaspoon of regular cooking oil (vegetable, olive, canola).
- Using a small brush have your kids paint over the figure with the oil. A little oil goes a long way. As the oil is absorbed by the paper the boils will start to come through.
- With a paper napkin wipe off any excess oil from the front and back of the paper.
Boil Infestation

Instructions
- Print the template. (Template)
- Color in the boils.
- Cut out all of the boils.
- Grab each individual boil and with a small amount of glue, have your kids glue them to their hands and arms.
- Now for the fun part. Make the boils look more realistic by using Vaseline, makeup (lipstick, eyeliner, etc.), or even paint.
The Plague On Livestock
Today’s craft is based on the fifth plague on Egypt, the plague on livestock.
“So the Lord did this thing on the next day, and all the livestock of Egypt died; but of the livestock of the sons of Israel, not one died.” Exodus 9:6
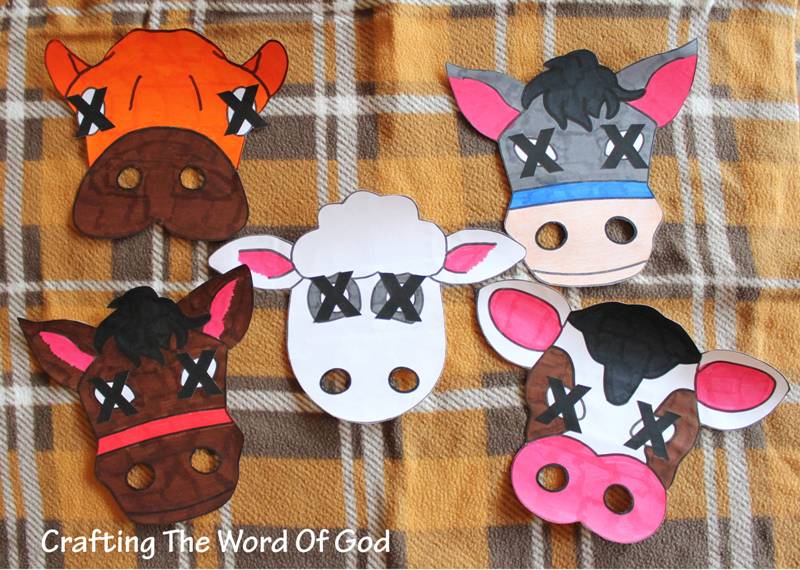
Instructions
- Print the templates onto cardstock. (Template)
- Color and cut out the masks. Let your kids choose which mask they would like to make.
- To finish the mask you can either punch out a hole on both sides of the mask and attach a piece of yarn or you can glue a large popsicle stick to the mask as a handle.
The Plague Of Flies
Todays crafts are based on the fourth plague on Egypt, the plague of flies.
“Then the Lord did so. And there came great swarms of flies into the house of Pharaoh and the houses of his servants and the land was laid waste because of the swarms of flies in all the land of Egypt.” Exodus 8:24
Fly Straw Rocket

Instructions
- Print and color template. (Template)
- Cut out each piece and glue them onto a piece of construction paper.
- Cut out both pieces from the construction paper.
- Glue the rim of both pieces together and stopping at the bottom of the wings. DO NOT add glue to the center of the pieces.
- Cut a straw into two pieces.
- When the fly is dry stick the straw inside the fly and blow up the fly. The air pressure will propel the fly forward.
Fly String Toy

Instructions
- Print the template onto cardstock. (Template)
- Assemble the clothespin piece. (Disassemble the clothespin. Glue the two wooden pieces together. Glue the metal piece to the top. Finally glue a small item between the legs of the clothes pin, something to give it some weight. I used a metal screw.)
- Color and cut out both flies.
- Color the clothespin black.
- Glue a the flies to the clothespin. One on each side.
- Cut a piece of yarn or string to your desired length. Stick the string in the metal bracket on the top of the clothespin.
Hold one side of the string higher than the other and the fly will slide down the string. As it slides down the string it will sway side to side giving the illusion that it is flying.
Pepper Fly

Instructions
- Print the template. (Template)
- Add glue to the pieces except the eyes and wings.
- Sprinkle coarse ground pepper on the glue. Tap any excess pepper off. (Use coarse ground pepper. DO NOT use the “fine powder” kind because your kids will be sneezing a lot.)
- Color in the eyes.
- When the pepper pieces dry, cut out all of the pieces.
- Assemble the fly by first gluing on the eyes. Next both wings and finally the top body piece.
The Plague Of Lice, Gnats, Fleas
Todays crafts are based on the third plague on Egypt, the plague of lice, gnats, fleas.
The word used in Exodus to describe the third plague is כִּנִּים which can be translated as lice, gnats or fleas. So I decided not to pick one of these insects specifically and will leave it up to you to decide which one to use.
“They did so; and Aaron stretched out his hand with his staff, and struck the dust of the earth, and there were gnats on man and beast. All the dust of the earth became gnats through all the land of Egypt.” Exodus 8:17
Balloon Lice, Gnat, Flea


Instructions
- Print the template onto cardstock. (Template)
- Color in the insect.
- Cut out the insect.
- Cut the solid line that is between the thorax and abdomen of the insect.
- Stick the lips/opening of a small water balloon through the cut you just made. It is better to pick a balloon color that matches the color of the insect. I only had green balloons that I could use for the example but having the colors match is best.
Your kids can now slightly blow up the balloons to help simulate the infestation and obviously the feeding these insects had over the Egyptians.
If you blow up the balloon most of the way, when you release the air the bugs will also scurry along the table.
Body Infestation

- Using a one hole punch, punch out many black or brown construction paper circles to represent the insects. You can also punch out red or pink circles to represent bug bites.
- Grab each individual circle and with a small dot of glue, glue them to your hands and arms.
Now your kids can pretend to be covered in these tiny insects.
The Plague Of Blood
This craft is a great visual of the first plague in Egypt. Your kids will be able to see the water of the Nile River turn to blood for themselves.
“20 So Moses and Aaron did even as the Lord had commanded. And he lifted up the staff and struck the water that was in the Nile, in the sight of Pharaoh and in the sight of his servants, and all the water that was in the Nile was turned to blood. 21 The fish that were in the Nile died, and the Nile became foul, so that the Egyptians could not drink water from the Nile. And the blood was through all the land of Egypt.” Exodus 7:20-21


Instructions
- Print the templates onto regular copy paper. Do not use cardstock. Print the main image on one side, then the river on the other side of the same paper. (Template)
- Lay one or two sheets of newspaper on your table.
- Have your kids color in the land, sand, pyramids, mountains and sky using markers.
- Next lightly color in the river with a blue color pencil.
- Trace the outline of the river with regular glue and allow the glue to dry.
- When the glue has dried fill in the river on the back with a red marker.
- In a small plastic container add about 1 teaspoon of regular cooking oil (vegetable, olive, canola).
- Using a small brush have your kids paint over the blue river with the oil. A little oil goes a long way. As the oil is absorbed by the paper the red marker will start to come through. The river will start to turn into “blood”.
- With a paper napkin wipe of any excess oil from the front and back of the paper.
- ← Previous
- 1
- …
- 3
- 4
- 5
- Next →

You must be logged in to post a comment.