OT Crafts
Tower Of Babel

Divide your children up into groups and give each group equal amounts of blocks: (ie. wood blocks, Lincoln Logs, Legos, jumbo blocks), Styrofoam or plastic cups.
The groups will race against each other to see who can build the tallest tower, in a given amount of time.
After time runs out, measure the towers to see which group has built the tallest tower. Then mix up the groups and play again.
You might enjoy these cute sponge blocks courtesy of Toddler Approved.
Or
You can even play a simple, but fun game of Jenga.
Sing To The Lord Tambourine
“Sing praise to the Lord, you His godly ones, and give thanks to His holy name.” Psalm 30:4

Instructions
- Print out the template and color it. Use the one that best fits the plates you will be using. You will need two circles. (Template)
- Cut out the circles.
- If the paper plates you will be using are stiff enough you will only need two. One for each side of the tambourine. If they are thin, then use four. Glue two together, at the end you will have two sides.
- Glue one template to each side.
- Lay one side down fill it with pinto beans, garbanzo beans or pebbles.
- Lay the second plate on top. Staple it shut. Add enough staples so that the filling does not come out.
If you choose you can cover up the staples using a little bit of white-out. After you finish stapling it shut, you can use a hole puncher around the edge. Then add different colored ribbons.
The Twelve Spies Bookmark
Trust. That is what ten of the spies lacked. They saw with their own eyes that the land was just as God had said it would be. They saw how God protected them and sustained them in the desert. Yet they focused on the difficulties of the situation.
We want our kiddos to be like Caleb. He saw the promise of God before him. He had total trust in God and in His promises. We should teach our kiddos to trust in God, even in the face of difficult obstacles and that is what this craft will remind them of every time they use it.

Instructions
- Print out the templates onto colored paper or construction paper . (Template)
- Cut out the leaves and the grapes. You will need around 20 grapes.
- Cut out the Trust template.
- Glue the leaves to the Trust template. Then the grapes.
- Cut of any excess grape overhang so that there is a clean edge.
- Glue onto a piece of white card stock.
- Cut it out leaving a small border of cardstock.
- Then glue onto a piece of purple construction paper.
- Finally cut it out again leaving a small border of purple construction paper.
For a variation you could use different shades of purple for the grapes.
I have also included an “I Am The Vine” template as a variation to this craft.
Days Of Creation
This craft project about the days of creation would be a great add-on to any Sunday School lesson. You can always use the craft to re-tell the Bible story after the kiddos are done making it.

This craft will require some prep work.
Instructions
- Print out the templates. (Template)
- Cut out each image and trace it onto the colored construction paper of your choice.
- Cut them out and glue them onto the designated number.
- Cut off any overhang of construction paper from the numbers.
- Glue the numbers onto cardstock.
- Cut out the numbers leaving a small white border around the number.
Rainbow Covenant
“3 The rainbow that I have put in the sky will be my sign to you and to every living creature on earth. It will remind you that I will keep this promise forever. 14 When I send clouds over the earth, and a rainbow appears in the sky, 15 I will remember my promise to you and to all other living creatures. Never again will I let flood waters destroy all life.” Genesis 9:13-15
This craft can be used to teach the story of Noah and to help reinforce the fact that God always keeps His promises.

Instructions
- Print the template. (Template)
- Glue cotton balls onto the cloud template.
- Cut out the rectangle from the template.
- Trace the rectangle onto six different colors of construction paper.
- Cut out the cloud and each individual rectangle.
- Glue the strips of construction paper to the back of the cloud.
To hang the cloud on a wall glue a piece of yarn in a loop to the back of the cloud.
Jacobs Hairy Arms
Rather than wait for God to work for Jacob, Rebekah took things into her own hands. Rebekah convinced Jacob to trick Isaac and steal the blessing. As a result Esau became very angry at Jacob and vowed to kill him. Jacob had to leave his home and family.
When we are waiting for God to act in a situation there are two ways in which we can respond. We can trust God and know that He is working for us or we can become impatient and act on our own. And as we can see from this story in the Bible the results are not good.
This is the lesson we want our kiddos to go home with. That in hard and difficult situations, even if we can not see God acting on our behalf, we still need to place our faith in Him and trust that He is working for us.
“The Lord is not slow to fulfill His promise as some count slowness…” 2 Peter 3:9
This craft will remind the kiddos of how Jacob and Rebekah both took matters into their own hand instead of trusting in the timing of God.


- Print the template. (Template)
- Trace them onto a foam sheet. The color of the foam sheet does not matter as it will be covered with cotton balls.
- Cut out both shapes from the foam sheet.
- Using a glue gun, glue two pipe cleaners/chenille stems to each foam shape. One near the narrow edge and one towards the wider edge. Again do this for both foam shapes.
- Glue cotton balls to the foam shapes using regular glue. Cover completely. Slightly pull apart each cotton ball before placing it on the foam sheet. This way you will need less of them.
- At this point if your kids want to, they can use a marker to color the cotton balls. Recommended colors: grey, black, brown, or yellow.
Pharaohs Head Dress

This craft can be done for different Bible stories and adapted for each one. It is very versatile. It can be used for:
- Abraham’s move to Egypt and his deception towards the pharaoh.
- Joseph becomes second in command over Egypt.
- God freeing His people through Moses.
Instructions
- Print the templates. (Template)
- Color them and cut everything out.
- Glue all the pieces onto construction paper, for strength.
- Cut the template out of the construction paper.
- Align the side pieces to the main piece and glue in place.
- Glue on the extensions that will go around the child’s head.
- After it has slightly dried, wrap the extensions around the child’s head, getting the correct fit.
- Use a couple of paper clips or a piece of tape to hold the shape. Then add glue to set it in place.
We Will Serve The Lord Two Ways
“As for me and my house, we will serve the LORD.” Joshua 24:15
This Bible verse has been memorized at some point in every children’s ministry. This is a great attitude to teach our kiddos and these crafts will be a constant reminder of this.
We Will Serve The Lord Door Hanger
This first craft is a simple hanging sign. After the children finish it they can place it on their bedroom door, on their bed post or even hang off the car rear view mirror.

Instructions
- Print the template on cardstock. (Template)
- Color and cut out all of the pieces..
- Glue the three large rectangular pieces together from biggest to smallest.
- Then glue on the Bible verse piece.
- Lastly cut out the space to be able to slip it onto the door knob.
If your kids like they can then add stickers, jewels, or draw on designs. Let them use their imagination.
We Will Serve The Lord Table Top
I found this version online and immediately fell in love with it. Sadly no template was available. So I decided to come up with my own. Place this finished craft on your mantle or table.
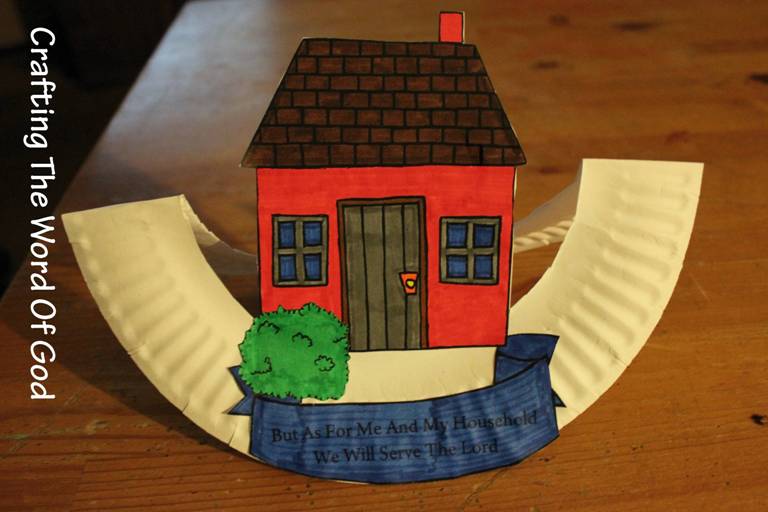
Instructions
- Print out the template. (Template)
- Color everything.
- At this point if you choose you can paint the paper plate.
- First glue the banner onto the paper plate.
- Then the house and finally the bush.
- Cut out the center circle of the plate cutting around the house.
- Then fold the plate in half to form the stand.
Ezekiel Preaches To The Dry Bones Sandbox Treasure Hunt
Kids love sticking their hands in the sandbox on a warm day. As a kid that was the first thing I did when we would go to the park. This simple activity helps reinforce the story of Ezekiel and it will only cost a couple of bucks to do this. Plus it offers countless hours of fun.
Buy a bag or two of plastic bones. You can get then all the same size or mix and match.

Bury the plastic bones in a sandbox in different depths. You can provide your kiddos with shovels, brushes or they can dig right in and use their hands. Remember to count how many you buried so you know if your kids have dug them all up.
This activity can also be adapted for any bible lesson. Just buy plastic toys in the shapes and sizes you will need for your lesson.

Goliath BullsEye Target
David and Goliath is the story of a young boy named David who wins a battle against a giant named Goliath through the power and dependence on God. Goliath is very intimidating and none of the Israeli trained soldiers dare to challenge him. Yet with God’s help David is able to take him on armed only with a slingshot and stone, without even wearing any armor to protect him. This game helps illustrate this famous story and can help teach children to allow God to fight their battles for them and to have faith in the strength of God, even against great odds.

You can use a variety of items when you play this game to try and land them on the target. A few ideas: small/aquarium sized stones, gray clay dried out to resemble stones, small bean bags, crumpled pieces of gray construction paper. If you laminate the target you can flick dimes as if you were playing shuffleboard. And for your older kids, if you trust them enough :), you can enlarge it and pin it behind a cork board. They can then try to hit the target using darts.
Instructions
- Print the template on cardstock. (Template)
- Color and cut all three pieces.
- Glue the target onto the face piece.
- Finally glue the smallest piece on top of the target piece.
Optional: Laminate the target using self laminating sheets or contact paper.

You must be logged in to post a comment.