Bible Crafts
The Plague Of Lice, Gnats, Fleas
Todays crafts are based on the third plague on Egypt, the plague of lice, gnats, fleas.
The word used in Exodus to describe the third plague is כִּנִּים which can be translated as lice, gnats or fleas. So I decided not to pick one of these insects specifically and will leave it up to you to decide which one to use.
“They did so; and Aaron stretched out his hand with his staff, and struck the dust of the earth, and there were gnats on man and beast. All the dust of the earth became gnats through all the land of Egypt.” Exodus 8:17
Balloon Lice, Gnat, Flea


Instructions
- Print the template onto cardstock. (Template)
- Color in the insect.
- Cut out the insect.
- Cut the solid line that is between the thorax and abdomen of the insect.
- Stick the lips/opening of a small water balloon through the cut you just made. It is better to pick a balloon color that matches the color of the insect. I only had green balloons that I could use for the example but having the colors match is best.
Your kids can now slightly blow up the balloons to help simulate the infestation and obviously the feeding these insects had over the Egyptians.
If you blow up the balloon most of the way, when you release the air the bugs will also scurry along the table.
Body Infestation

- Using a one hole punch, punch out many black or brown construction paper circles to represent the insects. You can also punch out red or pink circles to represent bug bites.
- Grab each individual circle and with a small dot of glue, glue them to your hands and arms.
Now your kids can pretend to be covered in these tiny insects.
The Plague Of Blood
This craft is a great visual of the first plague in Egypt. Your kids will be able to see the water of the Nile River turn to blood for themselves.
“20 So Moses and Aaron did even as the Lord had commanded. And he lifted up the staff and struck the water that was in the Nile, in the sight of Pharaoh and in the sight of his servants, and all the water that was in the Nile was turned to blood. 21 The fish that were in the Nile died, and the Nile became foul, so that the Egyptians could not drink water from the Nile. And the blood was through all the land of Egypt.” Exodus 7:20-21


Instructions
- Print the templates onto regular copy paper. Do not use cardstock. Print the main image on one side, then the river on the other side of the same paper. (Template)
- Lay one or two sheets of newspaper on your table.
- Have your kids color in the land, sand, pyramids, mountains and sky using markers.
- Next lightly color in the river with a blue color pencil.
- Trace the outline of the river with regular glue and allow the glue to dry.
- When the glue has dried fill in the river on the back with a red marker.
- In a small plastic container add about 1 teaspoon of regular cooking oil (vegetable, olive, canola).
- Using a small brush have your kids paint over the blue river with the oil. A little oil goes a long way. As the oil is absorbed by the paper the red marker will start to come through. The river will start to turn into “blood”.
- With a paper napkin wipe of any excess oil from the front and back of the paper.
The Ten Plagues Of Egypt
Moses goes before the Pharaoh multiple times demanding he let the Israelites go. He did this in the name of God, “Let My people go, so that they may serve Me.” Exodus 5:1; 7:16; 8:1, 20; 9:1, 13; 10:3
Pharaoh refuses to let the Israelites go. Moses warns Pharaoh that God will punish Egypt, but Pharaoh continued being stubborn.
As a result, God casts ten plagues upon the Egyptians. The ten plagues were a divine demonstration of God’s power and judgment designed to exalt God and force Pharaoh to “let my people go.”
This craft about the ten plagues of Egypt would be a great add-on to any Sunday School lesson. You can always use the craft to re-tell the Bible story after your kids are done making it.

This craft will require some prep work.
To make this craft easier to do you can use stickers for day 2-5 and 8. For day 9 you can use large googly eyes. And for the last day you can paint on a thin line of red paint across the number ten, then slightly tilt the number and allow the paint to slowly drip down the number.
Instructions
- Print the templates. (Template)
- Cut out each image and trace it onto the colored construction paper of your choice. You do not have to exactly copy the numbers in the picture.
- Cut them out and glue them onto the designated number.
- Cut off any overhang of construction paper from the numbers.
- Glue the numbers onto cardstock.
- Cut out the numbers. If you like you can leave a small white border around each number.
Golden Calf Idol
“I am the LORD your God, who brought you out of the land of Egypt, out of the house of slavery. You shall have no other gods before me. You shall not make for yourself a carved image, or any likeness of anything that is in heaven above, or that is in the earth beneath, or that is in the water under the earth. You shall not bow down to them or serve them, for I the LORD your God am a jealous God, visiting the iniquity of the fathers on the children to the third and the fourth generation of those who hate me.” Exodus 20:2-5
The Israelites were given a clear and simple commandment, but when they were faced with fear and anxiety by the absence of Moses for forty days they rebelled against God. They asked Aaron to make them an image of their supposed god and worshiped it in the most depraved ways.
There is a lot for our kids to learn from this Bible story. God is the only true living God. To worship anyone or anything besides Him is a sin and an open attack against who He is. Our kids should learn that we shouldn’t worship any image, idol or rendering of God because those things are not God. There is no way we can ever fully represent the holiness and awesomeness and perfection of God through an image. We would fail before we even began.
“4 Their idols are silver and gold, made by human hands. 5 They have mouths but cannot speak, eyes, but cannot see. 6 They have ears but cannot hear, noses, but cannot smell. 7 They have hands but cannot feel, feet, but cannot walk. They cannot make a sound with their throats. 8 Those who make them are just like them, as are all who trust in them.” Psalm 115:4-8


Instructions
- Print the templates onto cardstock. (Template)
- Color in the templates.
- Cut out all of the pieces, including cutting on the dashed lines of each piece.
- Glue both neck pieces together to form a single piece. Do the same for the body and the legs.
- At this point if you choose you can glitter each individual piece. Allow the pieces to dry.
- Attach the pieces together to form the golden calf.
Davids Harp
David was a master musician, a poet, a writer of psalms, a worshiper and a man after God’s own heart. This cute craft will serve as a great reminder of the life of David. A lowly shepherd boy chosen by God to be the king of Israel.

Instructions
- Print the template onto cardstock. If you use regular paper glue the template onto a piece of construction paper for strength. (Template)
- Cut out the template from the cardstock or construction paper.
- Color in the template.
- Using masking tape, tape five or six pieces of thin yarn onto the template.
- Finally add glue and join both sides of the template together forming the harp.
Jesus I Am…
This Bible craft is for teaching on the “I Am’s” of Jesus. Instead of asking our kids who they think Jesus is, we can lead them through scripture and show them who Jesus is. We should show them who Jesus Himself said He was. And that is exactly what this craft will accomplish.

Instructions
- Print the templates. (Template)
- Color in the first page.
- Cut out both circles.
- Make a small hole into the middle of the circles and stick a metal brad through it. Open and bend the legs.
Grasshopper

Kids will love making this grasshopper craft. This craft is very versatile and can be used for different Bible stories. It can be used for teaching the story of:
- The twelve spies.
- The ten plagues of Egypt.
- John the Baptist.
Instructions
- Print the template onto a sheet of cardstock. (Template)
- Cut out all of the pieces leaving a border of cardstock around each piece.
- Glue the pieces onto a sheet of black construction paper.
- Cut out all of the pieces.
- Glue each wing to the back of the grasshopper pieces.
- Take the rectangle piece and fold along both solid lines, making two creases.
- Add glue to one side of the rectangle piece and stick it on one of the grasshopper pieces, right between the thorax and the abdomen.
- Do the same thing with the other piece of grasshopper, making sure to line up both grasshopper pieces. The legs will now be able to hold up the entire grasshopper.
Elijah Taken Up To Heaven
“As they were going along and talking, behold, there appeared a chariot of fire and horses of fire which separated the two of them. And Elijah went up by a whirlwind to heaven.” 2 Kings 2:11
I had a lot of fun coming up with this craft. It took quite a few tries to finally get the size of the chariot and flaming horse just right. I’m sure your kids will love making it. This craft is a great reminder of the story of Elijah being taken up to heaven in a flaming chariot.
Suggestions
Scripture mentions flaming horses, not just a horse, so if you like you can print an extra horse for every child.
You can also make the reins out of colored ribbon or yarn.


Instructions
- Print the templates. This craft needs to be printed on cardstock. You can print it on regular paper, but you will then have to glue it onto construction paper. (Template)
- Color in all of the images.
- Cut out all of the pieces, including the spaces between the spokes of the wheel.
- For the flaming horse, after it is cut out, bend the solid lines making creases.
- Finish the horse by coloring in the blank flame on the horses mane. If you will be making two horses repeat steps 3-5 for the second horse.
- For the chariot bend the tabs on the platform of the chariot.
- Glue the platform to the main piece of the chariot (the curved rectangular piece). Start with the large back tabs. Then the smaller ones in front.
- Glue the flames to each side of the chariot.
- Glue on the small rectangular piece towards the bottom front of the chariot. Folding on the solid line and adding glue to the part marked with an x.
- Finally glue on the wheels to each side of the chariot.
Lot’s Wife
Lots wife not only was warned of the coming destruction of Sodom and Gomorrah, but was provided with a way of escape for herself and her family. She was given very simple instructions, do not turn around and look at the city. Instead of fleeing for her life she turned around because her heart was set on the sinful city and as a consequence of her disobedience she turned into a pillar of salt.
Instead of setting our minds and hearts on the things of this world we should set them on God.
“18 For many walk, of whom I often told you, and now tell you even weeping, that they are enemies of the cross of Christ, 19 whose end is destruction, whose god is their appetite, and whose glory is in their shame, who set their minds on earthly things. 20 For our citizenship is in heaven, from which also we eagerly wait for a Savior, the Lord Jesus Christ.” Philippians 3:18-20
“Set your mind on the things above, not on the things that are on earth.” Colossians 3:2

Instructions
- Print the templates. (Template)
- Color in the main image.
- Cut out the pillar figure.
- Glue the figure onto the main image.
- Brush glue onto the pillar figure then sprinkle on table salt.
- Allow the figure to slightly dry then tap excess salt off.
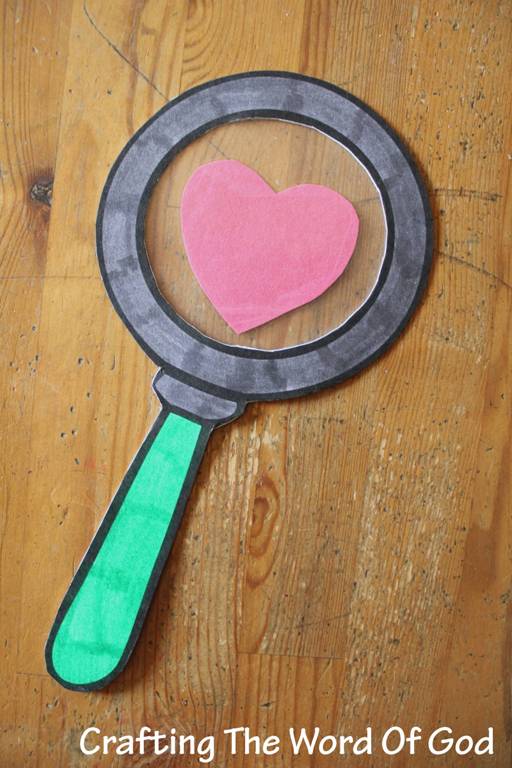
God Searches Our Hearts
Our kids are growing up in a world that is obsessed with outwardly appearances. They are made to feel like they won’t fit in if they don’t have the same clothes as all of their friends. Even adults are bombarded with commercials telling them they need this or that to make themselves more attractive and happier.
But what does God look at? What does He care about?
God looks at our hearts. “God sees not as man sees, for man looks at the outward appearance, but the Lord looks at the heart.” 1 Samuel 16:7
Since God looks at our hearts, shouldn’t we be more concerned with our souls than our bodies? This is what we want our kids to learn. “Look deep into my heart, God, and find out everything I am thinking. Don’t let me follow evil ways, but lead me in the way that time has proven true.” Psalm 139:23-24
Instructions
- Print the templates. (Template)
- Color and cut out the magnifying glasses.
- Glue the magnifying glass pieces to cardstock for strength.
- Cut out the magnifying glass from the cardstock.
- Cut out the heart and circle template.
- Glue the handles of the magnifying glasses together. Not the rim around the “glass.”
- Trace the heart onto a sheet of red construction paper and cut it out.
- Trace the circle twice onto contact paper.
- Cut out the circles.
- Take the back off of one of the circles and in the center of the circle place the heart.
- Remove the back of the other circle and place it on top of the heart/circle. This makes the “glass” of the magnifying glass.
- Place the “glass” in between the rims of the magnifying glass templates, centering it.
- Add glue to the templates to hold the “glass” in place.

You must be logged in to post a comment.