crafts
Samson’s Strength
This craft will bring out the creativity in your kids. Kids love reading the story of strong Samson and this craft will help them remember your lesson. Be creative with the materials you use.

Instructions
- Print and color the template. (Template)
- Depending on the material you use: String– Cut and glue different lengths of string to the top of Samson’s head. You can even mix and match colors. Cooked Spaghetti– When you cook the spaghetti, cook it in batches and add food coloring to the water. Playdough– Use homemade or store bought playdough.
If you laminate the page after you color it, you will get many uses out of this activity.
The Day Of Pentecost
You can find this craft all over the internet. Its very quick and easy to make, but kids love making it. This craft is a good way of illustrating the story of the day of pentecost to your kids. When they finish making this craft each child will have their very own “tongue as of fire.”

Instructions
- Print the template. (Template)
- Cut out all the pieces.
- Use the flame pieces as templates to trace them onto red, yellow and orange construction paper.
- Cut out the flame pieces and glue the pieces together.
- Grab the rectangle templates and trace the larger pieces onto the color of your kids choice and the smaller piece onto red construction paper. You will need three of each.
- Glue the smaller pieces to the larger pieces. Then glue the assembled parts together creating one long band.
- Place the band in front of your child and then glue the flame to the center of the band.
- Wrap the band around your kids head. Once you have the desired length use a couple of paper clips or a piece of tape to hold the shape. Then add glue to set it in place.
Jesus Heals A Paralytic Man
A cute craft to help the kiddos remember the story of Jesus healing a paralytic man. This craft can be assembled quickly if everything is printed onto colored paper or construction paper.

Instructions
- Print the templates onto different colored paper or construction paper. (Template)
- Cut the first page in half. Then take an xacto knife and cut along the parallel lines. This part should be done by an adult.
- Cut out the strips from the second page.
- Weave the strips into the rectangular base. Rotate going over and under with every new strip to create a weaving pattern.
- Cut out the feet.
- Finally glue on the feet to the mat by arranging the feet on the mat and then gluing them in place.
I have also included the words “Jesus Heals” in case you would like to add it to the mat.
Elisha Helps A Widow Match Game
A fun game to play to help accompany the story of Elisha helping the widow.

Instructions
- Print the templates. Each child will only need twelve cards (six pairs). They can pick and choose between the different jars. (Template)
- Color all the jars including the ones with the words. (The cards with the words should be colored the same color).
- Cut out all of the cards.
- Glue the the six pairs of cards onto construction paper.
- Cut out the six pairs of cards from the construction paper.
- Finally glue the twelve cards with the words to the back of the construction paper cards.
If you laminate the cards they will last for a long time. You can use self laminating sheets or contact paper.
Elisha And The Jar Of Oil
This craft will be a great reminder that God provides for our needs.
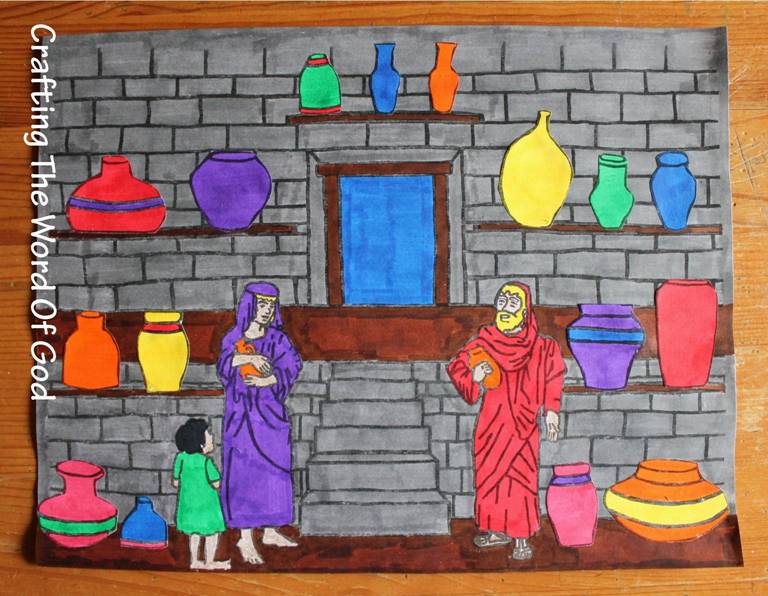
Instructions
- Print the templates. (Template)
- Color the main image and the jars.
- After the jars are colored in cut them out.
- Glue the jars onto the main image.
Days Of Creation Wheel
The Days Of Creation Wheel is a good way to share the story of God creating the world. Each wedge tells the story of what God did on that day of creation. This would make a great take home reminder of the lesson.

Instructions
- Print the templates on cardstock. (Template)
- Color and cut them out.
- Make a small hole into the middle of the circles and stick a metal brad through it. Open and bend the legs.
Jungle Jaunt Bible Crafts
I have been hard at work and as equally excited because in the coming weeks we will be working on preparing our church’s Vacation Bible School for this summer. Every year we choose from one of two themes provided by Life Way. This year we decided to go with their jungle theme version Jungle Jaunt.
![]()
So I have been busy as a beaver working and planning the crafts that will go along with our Bible story each day. Starting on Monday and continuing each day until Friday I will be posting our crafts for the entire week of Vacation Bible School. Each day crafts for a different Bible story.
I have noticed that many churches have already held their Vacation Bible School in June, but for those that still have not I hope these crafts will inspire you and help make planning your Vacation Bible School a little less stressful :).
Day 1 One Amazing Creator


Day Two One Miraculous Provider
Elisha Helps A Widow Match Game
Day 3 One Powerful Healer

Day 4 One Living Savior

Day 5 One Lord Of All

Blind Man Healed Mask
This craft will help your kiddos remember the story of Jesus healing a blind man. On one side of the mask you have a sad face with bandages on his eyes. This side symbolizes the blind man before he was healed. And on the other side you have a happy face with a big smile who has now been healed by the miraculous power of Christ.

Instructions
- Print and color the templates. (Template)
- Cut out both faces and the bandages. Each child will need two bandages.
- Glue each face onto a piece of construction paper. Both pieces of construction paper should be the same color.
- Cut out the faces again, leaving a small border of construction paper.
- Grab the happy face and place it facing down. Glue on a large popsicle stick for a handle.
- While this is drying glue on the bandages to the eyes of the sad face.
- Finally glue the sad face to the back of the happy face. The popsicle stick will be sandwiched in between both faces.
Update: Crafting The Word Of God Now On Video
I have recently opened accounts on both Youtube and Vimeo. Every Sunday I will be uploading a new video. These videos will be step by step videos on making the crafts on my site, starting in chronological order. Meaning I will start with my earlier crafts and continue from there. I’d love to read your thoughts!
Crafting The Word Of God
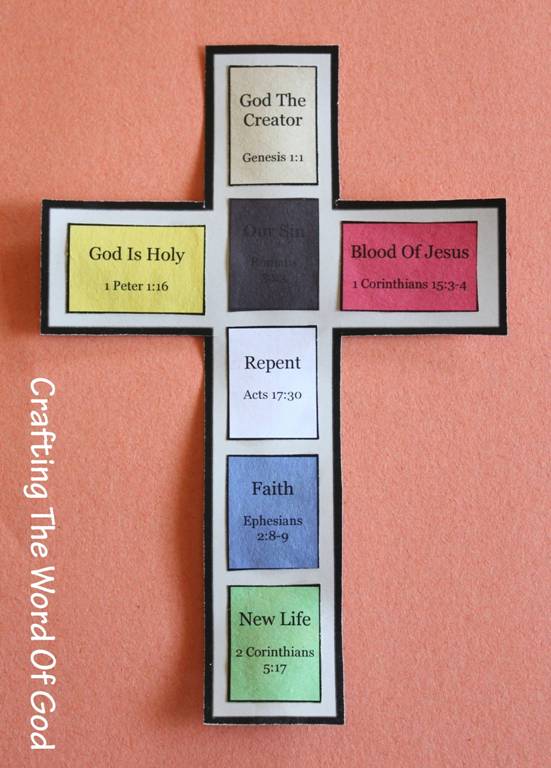
Gospel Cross
This craft makes use of colors to help children understand the gospel message. The color association makes it easy for children to remember each part of the gospel.
Brown– God As The Creator
Yellow– God Is Holy
Black– Our Sin, Total Depravity, Fallen Nature
Red– Blood Of Jesus, His Perfect Sacrifice, Substitutionary Death
White– Repentance
Blue– Faith
Green– New Life, New Creation
Instructions
- Print out, onto a page of light gray cardstock, the cross template. (Template)
- Cut it out.
- Print pages three to nine onto colored construction paper or cardstock. (Each page is labeled according to color.) Or if you choose you can print out the pages on white paper and your kids can color them in by hand.
- Using paper clips place each square on the cross in place. (The paper clips will hold each square in place so you are left with the correct spacing.)
- Glue each square in its place, one at a time.

You must be logged in to post a comment.